Instagram Reconstituer
Instagram is never going to get better. The same goes for all the big social sites—Facebook, Xitter, Reddit, and the like. Sure, there’s some enshittification happening, but it’s mostly about them keeping your eyes glued to a feed full of low-quality ads and posts from strangers. A friend might send you a link, and before you know it, you’ve spent half an hour scrolling through junk.
So, I finally deleted my Instagram account. I didn’t want to be a product they could sell or deal with all their pandering politics. And with Instagram getting worse every day, the choice became easier.
But I wasn’t ready to lose my Instagram entirely. It’s a neat slice of my history, so I exported all my data. What I got was a mess—450 JSON files and 4500 other files that aren’t very easy to browse. On top of that, some image files had the wrong extensions.
I first thought about making one HTML file you could just drop your export into. But thanks to modern browsers and their CORS rules, that wasn’t possible because the JSON files couldn’t be read directly. So, I ended up writing a PHP script that processes all the JSON, video, and image files to build a single HTML file along with a folder of images.
The PHP script grew into a jumble of fallbacks and error checks just to handle all the quirks in the data. I’m convinced they made the export as unwieldy as possible on purpose. Many HEIC files are actually JPGs with the wrong extensions, many videos lack thumbnails, and so on. It’s a perfect example of how platforms make it hard to leave—even when they let you “take your data with you.”
My tool—named Memento Mori (a bit overdramatically)—takes all those files and builds a neat website you can host on your own server. It even shows a date span from your first post to your last post. It feels a bit odd to recreate Instagram’s look to get away from Instagram, but I wanted to make it easier for folks to break free.
Anyway, here’s my export.
Documenting a Block
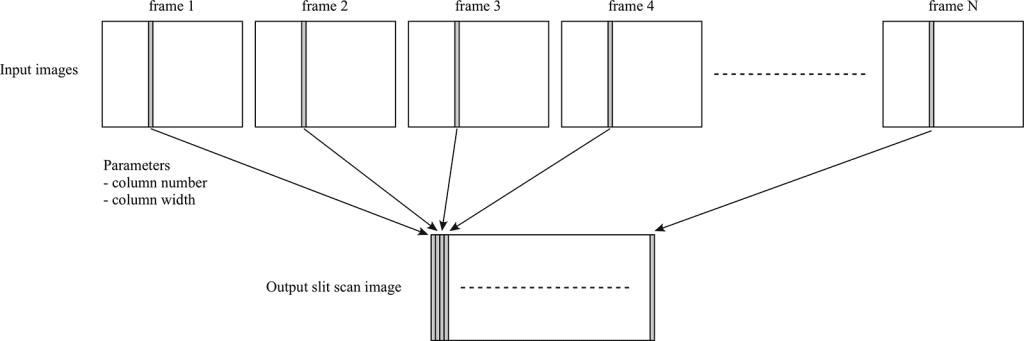
I’m trying to document an entire block for a project with Sarah (and maybe eventually an entire street), but trying to capture a continuous view of a block. If you take a series of photos while driving (stop, shoot, drive forward, stop, shoot,….), objects at different distances shift positions between frames making stitching together a cohesive photo difficult — aka the parallax problem.
I’m trying a slit-scan technique that captures thin vertical strips from a moving video, then assembles them side-by-side to create a continuous image.

It’s all a bit messy to make this actually happen, you have to slice up the video and then reassemble the video into a single image. Also in this case, the car was moving more than one pixel per frame so, I had to figure out how far the car moved for every frame of video — about 65px. Which is all good, but my speed wasn’t perfectly consistent so that stretches/shrinks the image unevenly.
The thing though that always strikes me about trying to record pictures of houses, there are cars, telephone poles, trees, etc. in the way. I had the idea that I could get several different points-of-view by building the panorama from the left, left-center, center, right-center, and right of each frame of video, and then combining those panoramas I could see behind the cars and trees. Buuut, turns out the perspective shift is really too much, does make a cool gif tho.

Here’s the video that the slitscan/gif came from.
I have a bit of code to share for this, but it’s all pretty hacky. Stripe.sh takes a folder of tif files and cuts them into little strips. If you need to generate your tifs it’s pretty easy with ffmpeg, or you could tweak the stripe.sh to work directly from a mp4
ffmpeg -i input.mp4 frames/%09d.tifThe second bit of code takes those stripes and assembles them, there are several options for overlap and testing.
Editing Wikipedia

Is “Big Al” short for “Big Alabama”? (Big Al is the elephant shaped mascot for the University of Alabama’s various teams.)
So I go and try to determine what “Al” is actually short for. UA’s websites? Not helpful AT ALL.
So I go read the Wikipedia page about Big Al, and you know when you read stuff on Wikipedia and you’re like “something feels off”?
“Big Al was named by a student vote. At the time of the vote, there was a popular DJ on campus by the name of Al Brown, who DJ’d many of the largest campus parties, including those hosted by members of the football team. As a result of DJ Al’s popularity, a campaign was started on campus to name the mascot after him, and that campaign succeeded at the polls.”
I’m like, that sounds like PURE NONSENSE.

So I start digging. Want to find out when this piece of information was added to Wikipedia. I go to the history and start clicking each year to see when the info appears.
2006… 2007… 2008… 2009… 2010… OK it appears in 2009. Look at every month and…
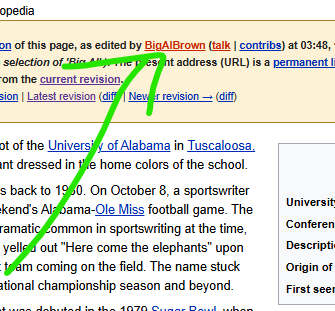
SOME DUDE NAMED BIGALBROWN edited the Wikipedia to add information about how Big Al was named after “Alfred Lee ‘Big Al’ Brown” which is TOTAL GARBAGE.
So I’m like, OK I can play this game.
I go look at ol’ Al’s Wikipedia user page, and they’ve only made ONE EDIT EVER, immediately after making their account, which is to add in this nonsense!
So I’m like, alright Imma go read the archives. I get on the UA library website and start trawlin’ through yearbooks from the correct time etc.
Nothing. Nothing. Nothing.

I turn to Google, and there are a lot of articles written AFTER 2009. So all these real news outlets have been fooled by this stupid Wikipedia article! CBS Sports and whoever else, all writing about how Big Al is named after this DJ.
So I BE THE CHANGE and remove that info from Wikipedia. Sorry, MR. AL. Your ruse is up!
So I think Big Al is actually named for the elephant that UA used to have ☠️ named “Alamite.”
Anyway, fun day in editing Wikipedia.
Film Development Data Collection
I shoot film sometimes, though haven’t managed to do it in a couple of years. First, we were on septic, and I wasn’t going to be putting development chems into the yard. Second, I’m a bit nervous about having the chemistry around my son.
In any case I’ve had an idea kicking around for a few years that you might be able to use machine learning to help figure out film and developer dilutions, times, and temperatures. The Massive Dev Chart mostly has you covered, but occasionally I’d run into an odd combination or do a push/pull that wasn’t on the chart and so I’d need to refer to the push compensation. Occasionally I’d do a push compensation and then also crank up the heat to keep the times from being interminable. I always made an image but was it the best I could have gotten? I mostly didn’t test enough to find out, though I did test one enough to make a submission to The Massive Dev Chart, which they emailed me back to make sure I hadn’t made a typo in the temperature.

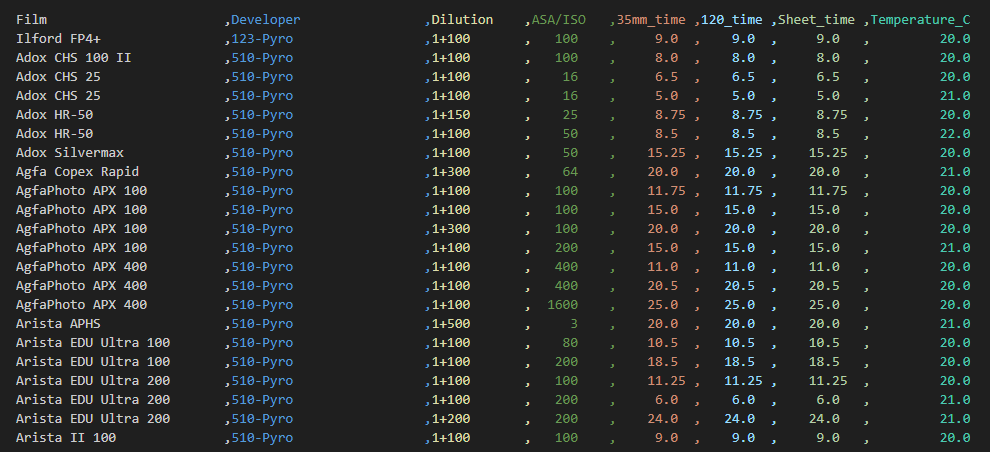
I haven’t gotten to the machine learning part of the project, but I wrote some code to collect data. I’ve got some cleaning up of the data going on to do things like drop all entries that don’t have a full complement of information and averaging numbers where it makes sense like when it says 200-300 ASA/ISO, that gets averaged to 250. I’ve also dropped all of the two stage developer entries, which isn’t ideal but it’s only about 200 out of 16,000. If you want the full-full set of data review the file ‘all-film-all-developer.csv’, though do note it’s full of duplicates.
Adventures in TTS
So, it turns out there’s a new text to speech engine on the block. It’s really good. Voices sound pretty human have little breaths and make sensible pauses and generally create well-formed speech. I wouldn’t say they’re as good as a great audiobook reader, but I’d say they’re better than the average audiobook reader. And you get to run it on your local machine.
There are also some new Edge-TTS voices, which if you haven’t played with them are really quite good, free?, and super-fast. Also, there are 300+ voices in many languages including about 50 for english. Most of the voices “VoicePersonalities” are set to “Friendly, Positive ” but there are some new ones that list things like warm, confident, authentic, honest, and rational.
I wanted to compare the voices and so I wrote a little tool that swaps between voices (code) but keeps your place in the recording. I had to spend a while trying to get the volume of all the recordings to be identical. I noticed that if a voice was slightly louder, I strongly preferred it. I wrote up a bit of code to try and fix that issue. I also struggled to find a piece of text that was a good test of the TTS engines, I picked a bit from The Fall of the House of Usher which is not in copyright and also has some words that are uncommon.
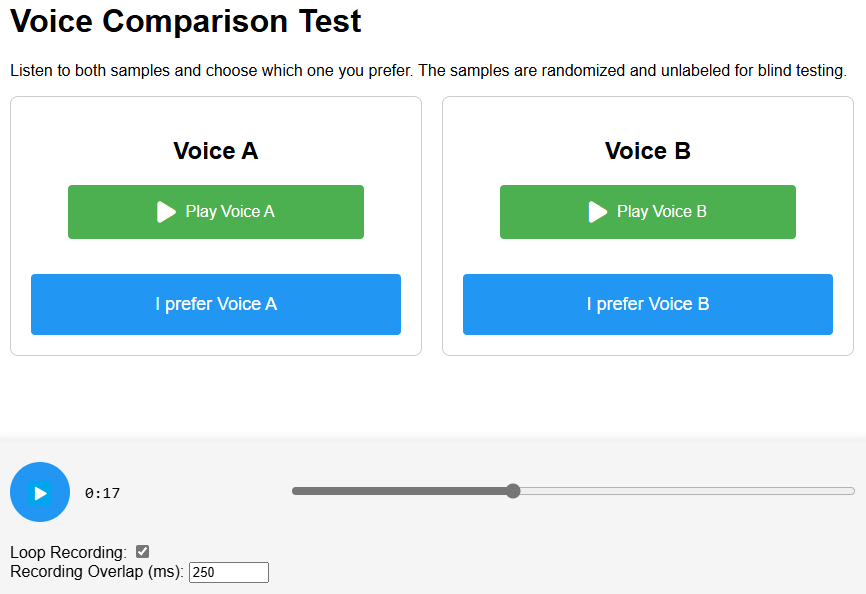
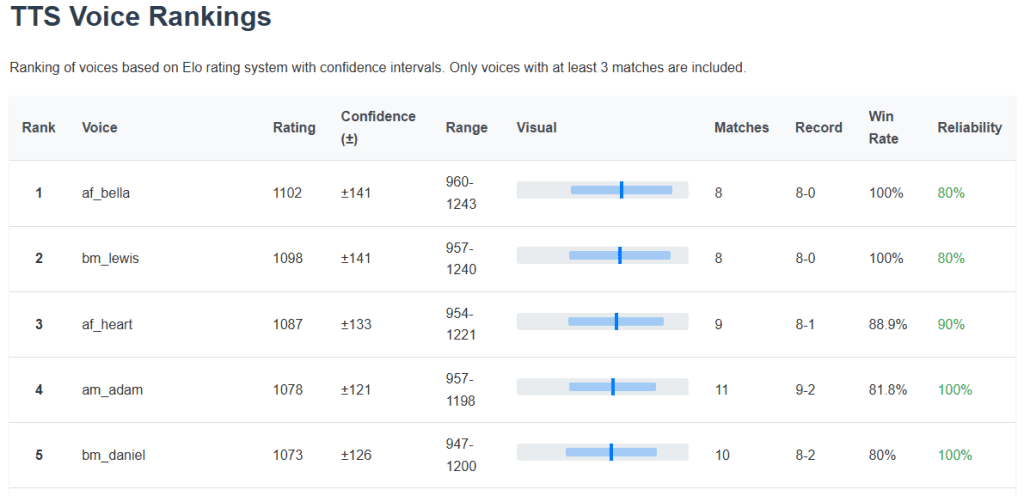
Then what I thought I really needed was a blind A/B comparison of the voices to see which one was the best. Which then necessitated some way to rank the choices. Initially I wrote some code to count the win/loss ratio for each of the voices but that seemed like not the best way. I worked up an Elo chess ranking system to sort the results.
I’ve run almost 200 blind A/B tests so far, I find the results pretty believable, but more would be better probably. If you want a quick TLDR; try af_bella and bm_lewis.
I hope to share the code for the testing/ranking soon but it’s all still in flux. It’s actually really hard to decide which paring of voices will give you the most information.
1/8